What a Summer it Was

Kits, selling, helping friends, a rally, Hobylette, Indian, jeez, there was a lot of stuff going on this summer.

The Baretta received a polini kit and a upjet, as well as a 11 tooth front gear (11×40). top speed is now about 45. Me Gusta. here are a few pictures of the install and the difference between the stock cylinder and polini cyclinder.

So after I kitted it, I timed it and got a temp sensor. I am running about mid to high 300’s, reaching up to 420 on big hills. the stock clutch fully engages at about 10-13 mph with the gearing I have.

I also helped install a 15mm intake and SHA on my friends maxi

I then picked up a Sears Free Spirit from Anacortes. It didnt have spark, switches, or sidecovers on it. After grounding the coil, I was able to get spark, Then I installed a new switch and let my friend ride it while he was rebuilding his bike. With a ported cylinder and a proma circuit on the stock jet (68) and leanest needle setting (yes that is correct) the bike went about 40mph at comfortable temperatures.

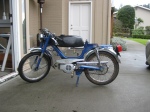
And here is a partial fleet picture, missing at the time were the Hobbit, Free Spirit, 1976 50V, and 40T. you will see them later.
left to right: 1981 Motobecane 51V Le Moped, 1970 Canadian Motobecane 50V, 1979 Baretta 38, 1978 Vespa Bravo, 1985 Suzuki FA50

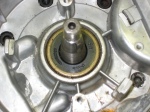
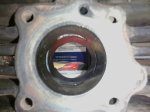
Soon after this picture was taken, the hobbit stopped working. I tore it part and found a large split in the seal. so I ordered up some new one and installed the Boyesen ‘stock’ 2 stage performance reeds while I was at it. seemed to help with the low end a bit, didn’t gain anything up top.
Also, at this point in time, the Vespa Bravo, and all 4 Motobecanes were not titled. In WA, take a picture of the VIN and get a bill of sale and start hitting up Licensing agencies until they comply with 3 year registration. most places don’t know what to do and will shoot you down. If that happens, move on the next one.

Back In January, a friend/coworker of mine bought a 1971 motobecane, exactly like the one I had picked up a few months prior. We tore it down, replaced the bearings, seals, variator, threw a 74cc kit, 15mm carb, and ninja g3 pipe on it. It still needs some variator tuning, but dang that thing is fast. It was also the most frustrating ped to work on, but thats what you get with a Motobecane sometimes. Mine is the one with the whitewalls. Pic:

Since I had been collecting all these peds, I was beginning to run out of room and time in my schedule to work on them and ride them all, so I started to sell them. Now gone are the Le Moped, the Free Spirit, and the FA50. Pictures of the sales below.

I sold the Le Moped for $380, Free Spirit for $600, and the FA50 for $350.

Now it is Hobylette time! the POS 40T frame I had picked up was just a roller. wheels, forks, frame, and some other bits and pieces. The previous owner had taken a hole saw to the gas filler, so with the help of a spare tank and mt dads welding skills, made it complete again. the tank still needs to be coated due to some pinholes, but otherwise it is sturdy, has straight forks, stops well. Now on to the engine! I bought a PA50II engine off ebay for $100, rebuilt it with new seals and gaskets, put on a DR kit and attempted to use the stock carb without an air filter. no go. I will most likely have to get a PHBG and a new intake for it to clear the front pedal sprocket. If that doesn’t work, i’ll have to custom make something that clears the frame and pedal sprocket. as for the engine spring and mounts, I am using 1/8th stainless scrap that I got from a local metal company that I cut and drilled to size to use the stock hobbit mounts and stock moby mounts. works awesome. the spring is a gas lift from where I work. I was going to use 2 20lb lifts, but I think I am going to opt for a 40lb-er. I also just found out about those new moby rear variators. WANT, but no can afford, so single variator it is! TJT in the future instead. There is still a lot of work that needs to be done on the Hobylette, and it probably wont be finished until next year, when I have more time and money. Pic:

Thats all for now, quite long winded, stay tuned for a bit more about the summer

What a Presidents Day Weekend


Heres a BIG update on everything

This weekend was awesome. I come home on friday and immediately start working on my brothers Vespa. I started off with a new main seal. Very easy; just a bit of heat and it comes right out. We then put the new exhaust on. Turns out it was broken from the factory, so we recruited my dad to re-weld the seam that was split, then painted it black. mounted it up, re-jetted and it wouldn’t run right. When I had replaced the seal I had forgotten to re-time it. It ran perfectly after that. He had also ordered a new speedo cable because the old one was broken. We found out why the old one broke while installing the new one. The speedo gears were frozen. Now he needs a new one of those too. He also hated the seat so he took it off and made a temp one out of plywood, a few towels, duct tape and zip ties, in the true moped fashion. He’s now cruising about 35 on the stock 12.10 carb with his new seal, techno circuit and drive belt.


On Saturday I went and picked up a few more mopeds: all Motobecanes. I had seen them on Craigslist over in Yakima but wasn’t able to go get them. I get a message on Facebook from a friend saying that he was the one who picked them up, and was wondering if I wanted to buy them from him, so I did! I drove out to Woodinville with my friend Curt to pick them up. A 1980 Le Moped (black), a 1976 50V (yellow), and a 1976 40T (orange)! all were in pieces and incomplete, but I like projects. The 40T I really like, and has been a moped I have been looking for since the beginning. It is a hard tail, meaning it has no rear suspension. Here are the bikes!

I got the bikes home, but had other projects I really needed to get done, so I moved them aside and got started on the Baretta. The Techno Estoril I had gotten earlier went on moderately easy, I had to dremmel a bit of material off to make it fit, and still need to make a proper rear exhaust hanger (right now its just zip ties). after jetting, it hits pipe at about 15mph and just keeps going and going up until what I think is about 40. this is on a 100% stock 30mph cylinder. there isnt much low end though, so climbing the massive hill by the house is still near impossible for anything except kitted bikes, 2 speeds (even thats pushing it), and hobbits.

On to Hayleys moped! I got a new exhaust and a 30mph cylinder for it. The combo of the two unfortunately offered little performace boost. about 4 mph, but it sounds cooler I guess. I think I might put a 70 airsal on it in the future. Another thing too is that the Proma exhaust sits very low to the ground, so I am going to heat it and bend it upward so it will fit more snugly against the frame and not scrape over every bump.


Oh yeah! the FA50. Here it is, I don’t think you guys have seen it yet. its pretty crusty right now. I think I will have it running next weekend.


Also a few weeks ago I helped my friend get his Hobbit running. Here are a few pictures of putting it back together after we painted the frame matte black with a few coats of semi gloss clear. I may have a few more pictures of it later on.


An finally as I finish this crazy long post, here are a few cool pics of my Hobbit


New Pipes


I got new exhausts for the Baretta and the Moby a bit ago. A Tomos A35 Techno Estoril (the bigger one) will be bent out 5 degrees and fitted to the Barettas V1 engine. The smaller is a Vintage Proma for a Motobecane AV7 engine. I am looking forward to installing these this coming weekend! It will be nice to have a bit of extra power from both of the peds. I also have some tomos 5 stars for the Baretta, a 30 mph cylinder for the Moby, and a new transmission for the FA50 that I got from my girlfriends uncle. My brother ordered a few parts for his Vespa as well (pipe, seals, speedo cable and a few other things), so saturday will be a day full of peds.

Baretta time, and some Vespa Bravo Pictures


The tank is temporarily mounted to the Baretta, and here are a few pictures of my brothers Vespa finally.

Hobbit, Moby, Barretta, and a Party!

I had a bit of free time on thursday night so i Decided to get my hobbits lights and speedo working again. The speedo cable broke about 6 months ago and I hadnt replaced it because the stock ones are so expensive and hard to find. Also my headlight had blown up twice, and i didnt want to pay 32 bucks plus shipping to get a new one, so I cut a hole in it! I turned the sealed beam into a easily replaceable beam. Dremel out a bit around the bulb, break the bulb inside, and pull that stuff out. I got a single contact bulb and socket from NAPA and after a bit of bending got the light to stay in place. Success! Now I have a working headlight after a bit of wiring. I then installed the speedo cable and new tail and brake lights and I was set to go! Now i just have to install the rear brake pad.


Meanwhile, I drew this of the Barretta. I am pretty sure this is close to what it will look like when it is done


Friday Night Riding with Will!


Now onto the Moby!


The Moby got a HUGE revamp this weekend. New whitewall Sava MC11’s, new Magura controls, new cables, new Dellorto 15.15 SHA, mild porting, and a good rewire to make the lights work! (I could not get them to work on the stock wiring setup) I love the smell of new tires. These Savas went on in a breeze, it was so much harder installing 2.25 Michelin Gazelles on the Hobbit. These things went on easier than the old Cheng Shin tires came off! No popped tubes Either. The controls were easy to put on, as were the cables (which had to be cut to size a bit, but that was easy and expected). Next we moved to porting the cylinder and grinding a few pieces to get the new Malossi intake to clear the fins of the cylinder. That went uneventfully and smoothly.

This whole time there was a party going on next door. Right after the cylinder was ported, we got a knock on the door inviting us over. Party time! (kinda) We only stayed for about 30 min or so, and then went back to mopeding.

We made new gaskets and put the engine together. Reading off the Moped Tuning Sheet, we put a 60 jet in it. We took the bike outside, and in the middle of the party, started it up. For some reason it was throttling out of control. We were tired at this point so we called it a day. 2AM!


jets jets jets jets!

I woke up late the next day and immediately got started on the Moby. I needed up going to Ace hardware 4 times getting electrical connectors and bolts so I could put on the footpegs I had gotten and rewire the bike. I drew my own wiring diagram and had it approved by Rebel Moby. Both the footpegs and wiring work perfect! Now I have lights and can ride doubles. Now was time to address the throttle. For some reason there was a kink in the cable so I freed it up and it worked perfect, but now the engine was running weird. After changing the jet about 8 times I was thinking my seals had gone bad overnight somehow, then I looked and saw I had forgotten to put the grounding strap back on the engine. Once I did that, the bike started up and idled like a dream! Rode it to Ace to show the people who had helped me through the day and then met a friend as the Starbucks in the same parking lot, and tested the footpegs by giving him a ride home. 20mph riding doubles, 32 single.

My friend who was working on the Moby with me the whole time was a huge help, and I am pretty sure I would still be working on everything had he not been there. Thanks Will!

Winter Break: So Many Projects

Winter break was here. Since I was home for school I was able to work on mopeds in my dads awesome garage while I wasn’t working. First up: Minarelli V1. since it had been sitting for so long, the seals had gone bad on it, so it was running lean and only got up to 25mph. I split the cases and got to work. It was all fairly simple, and while it was apart I took the liberty of filing a bit of the cases to prep it for a kit in the near future. since the bike only had 600 miles on it, I could still see the crosshatching on the cylinder, and the rings were minty. teardown and reassemble took about 3 or 4 hours of work, since removing the old gaskets took about an hour or so. After reassembly of the engine, I drilled out the carb to a 14.13. I put everything back together, added 30w oil to the transmission, started up 1st kick, and goes 32mph.


I am always looking for new projects, so when I found a Vespa Bravo in Bellingham for $100, I drove up and got it for $75. It didn’t have spark, so that was a bit of a fix, but about 6 hours of work later we got it running and driving, on a bad seal. That will be another project. I gave this ped to my brother for christmas. He loved it. Still needs a few things here and there, but it will be a good project for him


Unfortunately I do not have pictures of the bikes completed yet, they will be on here soon.

A Few Projects

Yesterday I got a call from my friend Will who needed a ride down to seattle to pick up a $100 hobbit from one of the guys from our summer Moped Wednesday rides. We pick it up in pieces, so its a bit of work. He has a bunch of hobbit parts back at home, so to bring it back to life wont be very hard. The wheels are toast and the rear variator needs to be reshaped. The forks are in good shape, frame is unbent, rear fender as well. Tank is un-dented, but full of rust. Our plans were to start sandblasting right when we got to the shop, but it turns out our air compressor is broken. We were able to blast about the size of a fist on the gas tank before we ran out of air, so that will happen later. We tried breaking into the engine. The intake bolts are seized in place, so we took the carb off the intake to see how dirty it was. It was fairly clean inside, just a little junk at the bottom of the bowl. The bearings in the engine still feel good, so thats a plus. He has a bit of work to do